CRA에 EmotionJS 적용하기
2021-04-09 금요일
첫번째 시도
- CRA로 React App 생성
mkdir my-app
cd my-app

npx create-react-app . # 현재 디렉토리에 설치- emotion 관련 package install
npm i @emotion/react인스톨 해서 바로 쓰면 적용될 줄 알았다. 하지만 전혀 되지 않았다.
import { css } from '@emotion/react';

function App() {
  return (
    <div className="App">
      <div css={divCss}>Hello</div>
    </div>
  );
}

const divCss = css`
  font-size: 50px;
  color: red;
`;

export default App;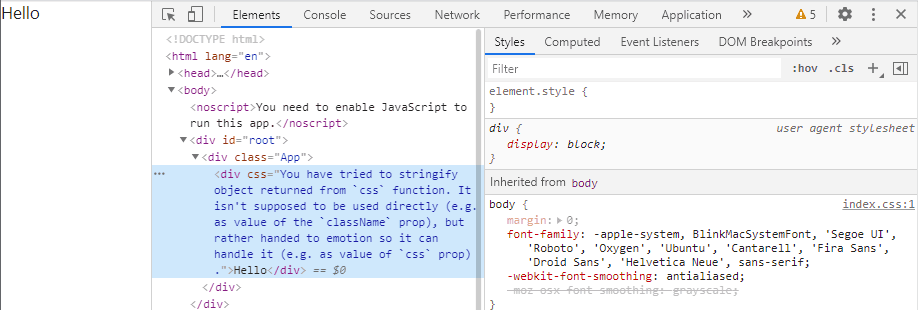
그래서 @emotion/babel-plugin 을 설치하고 .babelrc 파일을 생성하여 적용해 보았다.
npm i -D @emotion/babel-plugin{
"plugins": [
"@emotion"
]
}npm start 를 다시 해봤지만 똑같았다. (공식 문서를 따라서 하고 있는 중이다.)
@emotion/babel-preset-css-prop 도 설치하여 적용 해봤지만 되지 않았다.
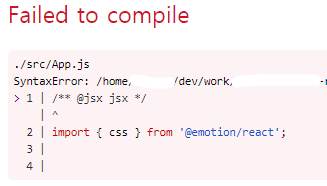
공식문서에 /** @jsx jsx */ 를 상단에 추가하라는 내용이 있어서 추가해봤지만 오히려 에러만 뜨고 이것저것 해봐도 해결이 되지 않았다.
두번째 시도
첫번째 시도 내용이 짧아보이지만 실제로는 이것저것 검색해보고 적용하느라 4시간쯤 삽질하였다.
그러던 중 .babelrc가 전혀 적용되지 않는다는 사실을 알게되었다.
일부러 .babelrc 내용을 막 틀리게 써도 에러도 전혀 뜨지 않더라.
cra babelrc 키워드로 검색해본 결과 CRA 로 생성한 리액트 앱에서는 .babelrc 가 적용되지 않는다는 사실을 알아냈다.
직접 적용하고 싶으면 eject 를 해줘야 한다.
eject 를 하지 않고 적용하는 방법도 있지만 오히려 패키지를 설치해야되서 더 번거로워 보였기에 패스.
그래서 eject 를 통해 적용에 성공하였다.
- CRA로 React App 생성
- git commit - 하지 않으면
eject가 되지 않는다.
git init
git add .
git commit -m 'init'
git commit 을 하려면 user 정보를 설정해줘야 한다.
git config user.name ZungTa- eject 진행
npm run eject명령어를 치고 나오는 질문에서 y를 눌러준다.
eject 를 하고나면 config , script 폴더가 생기고 package.json 의 내용이 변경된다.
package.json 에 babel 내용이 추가된 것을 확인할 수 있다.
...
"babel": {
  "presets": [
    "react-app"
  ]
}
...@emotion/react패키지 설치
npm i @emotion/react@emotion/babel-preset-css-prop패키지 설치
css prop 을 사용하려면 설치해서 적용해줘야 하는 것 같다.
npm i @emotion/babel-preset-css-propbabel설정 적용
plugins 는 추가 안해도 적용되긴 하지만 혹시 나중에 문제가 생길 수 있으니 넣어줬다.
{
	...
	"babel": {
	  "presets": [
	    "react-app",
	    "@emotion/babel-preset-css-prop"
	  ],
		"plugins": [
	    "@emotion"
	  ]
	}
	...
}- App.js 작성
import { css } from '@emotion/react';

function App() {
  return (
    <div className="App">
      <div css={divCss}>
        Hello
        <span className="baby">Baby</span>
      </div>
    </div>
  );
}

const divCss = css`
  font-size: 50px;
  color: red;

  .baby {
    font-size: 20px;
    color: blue;
  }
`;

export default App;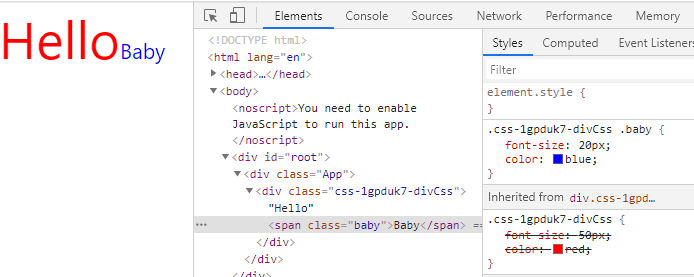
적용이 잘 되었다.
위와 같이 하위 class까지도 적어서 적용할 수 있다.
미디어 쿼리나 pseudo element 도 할 수 있는 것 같은데 차차 알아봐야겠다.
Typescript에 적용
이제 타입스크립트에 적용해보도록 하겠다.
- CRA로 Typescript React App 생성
mkdir my-app
cd my-app
npx create-react-app . --template typescript- git commit
git init
git config user.name ZungTa
git add .
git commit -m 'init'- eject
npm run eject- install packages
npm i @emotion/react @emotion/babel-preset-css-prop- babel config 적용
{
	...
	"babel": {
	  "presets": [
	    "react-app",
	    "@emotion/babel-preset-css-prop"
	  ],
	  "plugins": [
	    "@emotion"
	  ]
	}
	...
}- App.tsx 수정
import { css } from '@emotion/react';
function App() {
return (
<div className="App">
<div css={divCss}>Hello</div>
</div>
);
}
const divCss = css`
font-size: 50px;
color: red;
`;
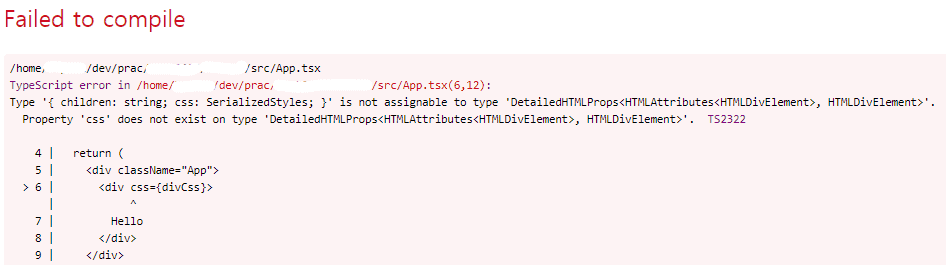
export default App;이렇게 적용하고 실행하면 되는 듯 하다가 에러가 뜬다.
공식문서에서 /** @jsx jsx */ 를 최상단에 쓰면 babel plugin 없이 순수 타입스크립트로 css prop 이 되게 할 수 있다고 하는데 적용되지 않는다.
저 /** @jsx jsx */ 는 쓰면 오류만 뜨니까 쓰지 않겠다.
이제 tsconfig.json 에 약간의 내용만 추가해주면 작동한다.
{
	...
  "compilerOptions": {
    "jsxImportSource": "@emotion/react"
  }
	...
}
추가내용
const divCss = css`
  font-size: 50px;
  color: red;
`;
이런 식으로 backtick 으로 함수를 사용할 때 vscode의 vscode-styled-components 확장을 설치하면 더 편리하게 사용할 수 있다.
